![3.2_logo_outlined_black.png]](https://help.shore.com/hs-fs/hubfs/3.2_logo_outlined_black.png?height=34&name=3.2_logo_outlined_black.png)
To use the Star Micronics mC-Print 3 receipt printer, you'll first need to prepare it and connect it to your iPad via Bluetooth.
Overview of the Printer
Model name: Star mCP31LB
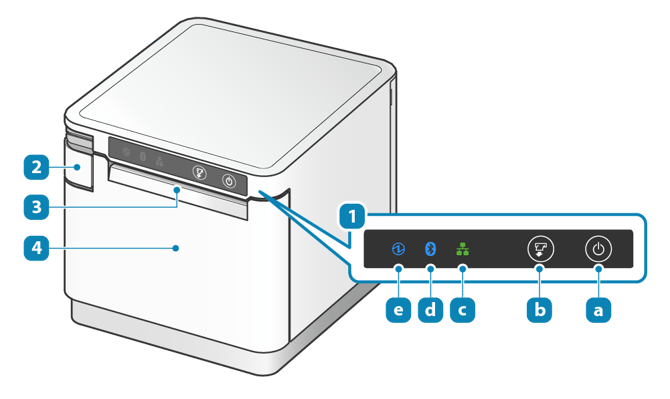
1. Control Panel
This control panel contains the printer's operating switches and LED lamps that indicate printer status.
a) Power Button
Turns the device on/off.
b) FEED Button
Press this button to feed paper.
Also use this button to perform a self-test print.
c) Network LED
This LED lights up green depending on the network connection status.
d) Bluetooth LED (MCP31LB model only)
Lights up blue depending on the Bluetooth connection status.
e) Power LED
When the printer is turned on, this LED lights up blue, red, or magenta depending on printer status.
2. Release Lever
Pull this lever to open the printer cover when inserting the paper roll.
3. Paper Output
This is where the printed paper is ejected.
4. Printer Cover
Opens/closes when inserting the paper roll.
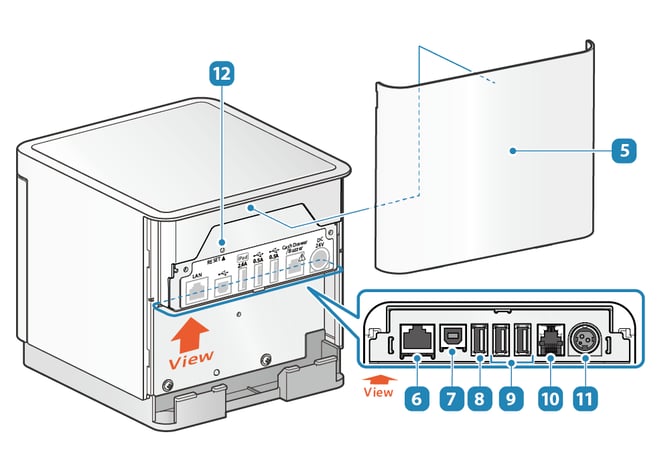
5. Rear Cover
Remove this cover when connecting cables.
6. LAN Port
Connect the LAN cable here.
7. USB-B Port
Connect the Windows or Android device to the main unit to establish communication.
8. USB-A Port (2.4 A) (MCP31LB, MCP31L, MCP31LBNH, MCP31LNH)
Connect the iOS device to the main unit to establish communication and provide power (max. 2.4 A).
9. USB-A Port (0.5 A) (MCP31LB, MCP31L)
Connect USB-connectable products (BCR-POP1, SCD222U, or USB HID-class devices such as a keyboard*) specified by Star Micronics to establish communication.
This port can also be used to power USB peripheral devices (max. 0.5 A).
10. External Device Drive Connector
This is a driver circuit for operating the cash drawer, the external buzzer (optional), and similar devices.
11. Power Connector
Connect the power adapter supplied with the main unit.
12. RESET Switch
Use this switch to reset the main unit's network or Bluetooth settings.
Preparing the Receipt Printer
- Take the printer out of the packaging and place it where you'd like it to go.
- Connect the printer to power using the included power adapter.
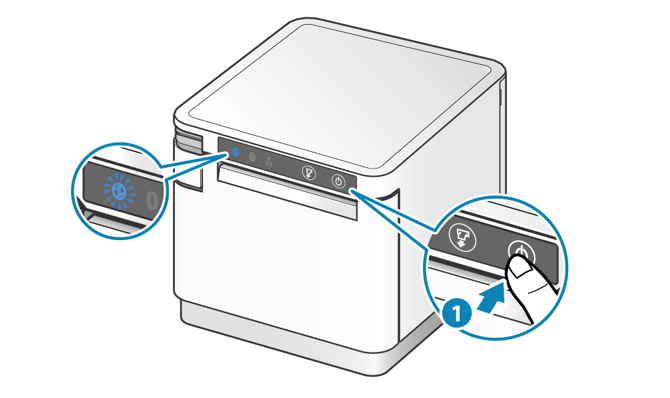
- Press the power switch to turn it on or off.
- Now insert the receipt roll. First open the printer's front cover by pressing the lever (1) on the left side.
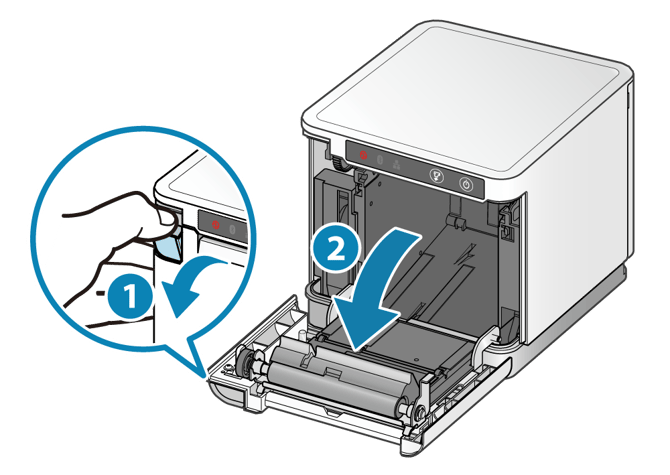
- Insert the receipt roll as shown in the illustration below.
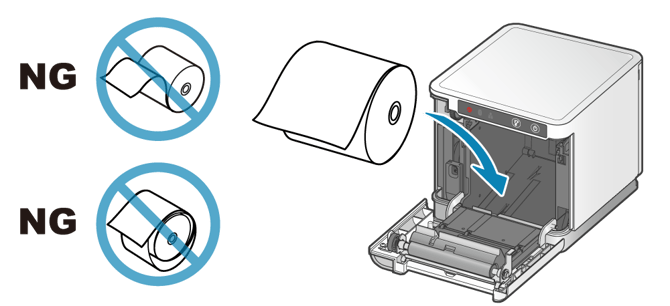
- Let the end of the roll stick out slightly from the printer, then close the cover by pressing up on both sides of the cover.
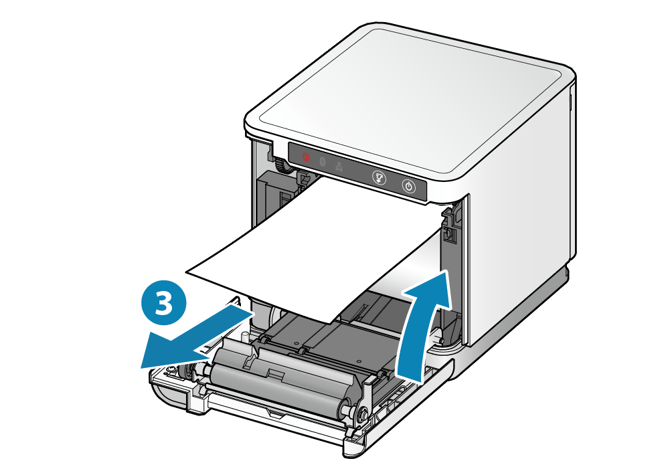
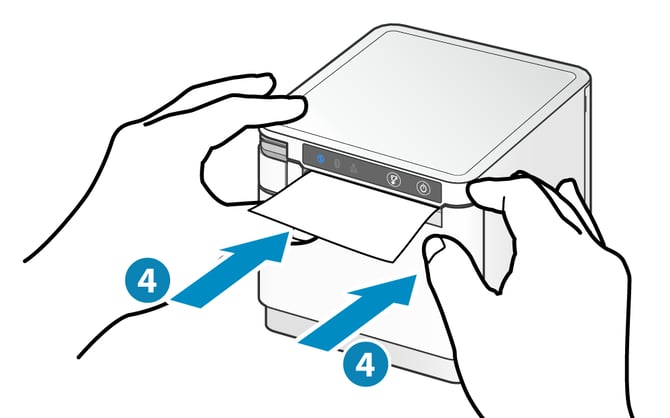
If the printer runs out of paper, the power LED blinks red.
A brief red blink indicates that the paper is about to run out.
Connecting the Bluetooth Receipt Printer to Your iPad
- Open Settings on your iPad.
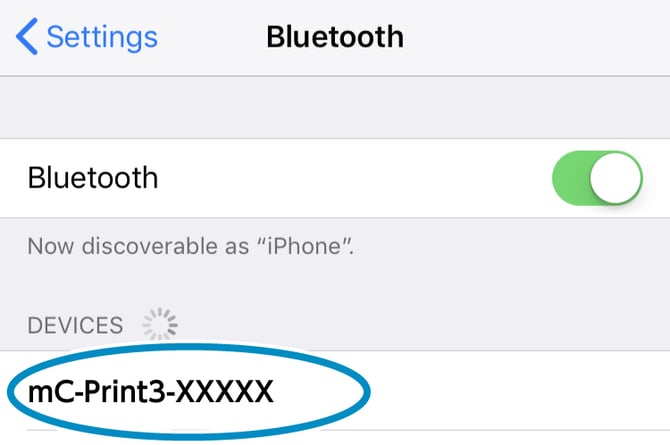
- Select Bluetooth. Make sure Bluetooth is turned on.
- Press and hold the power button on the printer for about three seconds to turn the device on. The device is now ready to pair.
- Once the receipt printer appears in the list (Star Micronics mC-Print 3), tap it.
Setting the Receipt Printer in the Shore POS
- Open the Shore POS App on your iPad.
- Tap the arrow > in the top left to open the app's menu, and select Settings at the bottom.
- Select the menu item Hardware > Select Printer.
.webp?width=670&height=502&name=File%20(7).webp)
- Tap the Star Micronics mC-Print 3 entry to set the printer as the active device.
.webp?width=670&height=502&name=File%20(6).webp)
The printer is now set up and will automatically connect to the iPad from now on whenever both devices are switched on and within range.
LED Indicators
The normal power status or communication status, as well as error information such as being out of paper, is shown by the power LED, Bluetooth LED, and network LED.
Each LED independently shows status or error information.
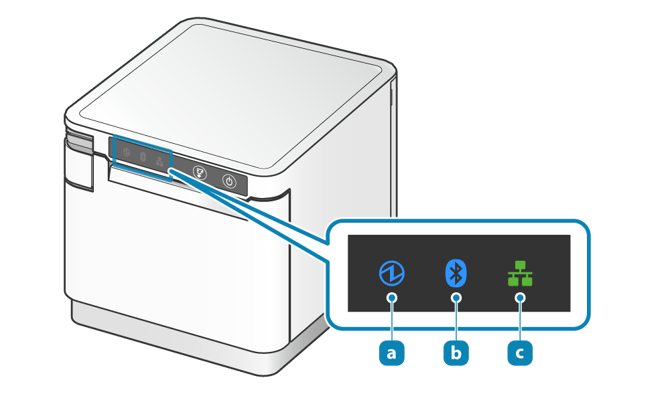
a) Power LED
Lights up or blinks blue, red, or magenta depending on the printer's power status, warnings, or error information.
b) Bluetooth LED
Lights up blue depending on the Bluetooth connection status.
c) Network LED
Lights up or blinks green depending on the network connection status.
Troubleshooting
Resetting the mC-Print3 (Network/Bluetooth Settings)
Important: The RESET switch on the mC-Print3 only resets the network and/or Bluetooth settings, not the entire printer. Use this reset when the printer can no longer connect.
- Turn off the printer.
- On the back of the printer, there's a small RESET opening (item 12 in the overview above).
- Using a thin pen, press and hold the RESET button.
- Turn on the printer while continuing to hold the button.
- Keep holding the RESET button until the network LED blinks green.
- Use the FEED button to switch between the following options:
- Network LED blinks green → network/LAN will be reset
- Bluetooth LED blinks blue → Bluetooth will be reset
- Both LEDs blink → network and Bluetooth will be reset
- Once the desired option is shown, hold down the FEED button for about 1 second to perform the reset.
- The printer will then automatically restart.
Don't turn off the printer during the reset process.