![3.2_logo_outlined_black.png]](https://help.shore.com/hs-fs/hubfs/3.2_logo_outlined_black.png?height=34&name=3.2_logo_outlined_black.png)
Setting Up the Printer
To use the Epson printer, you'll first need to prepare it and connect it to your iPad via Bluetooth.
Preparing the Printer
- Take the printer out of the packaging and place it where you'd like it to go.
Connect the printer to the power supply using the included power adapter.
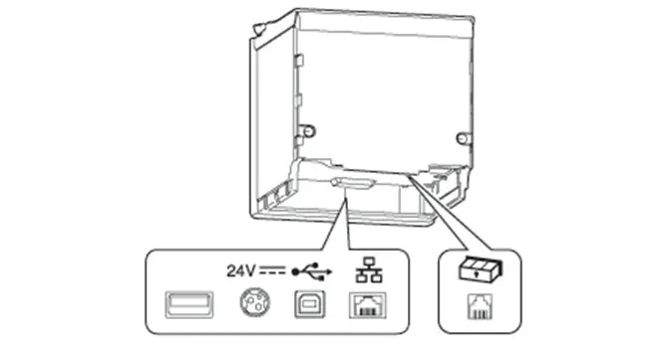
- Press the power button to turn it on or off.
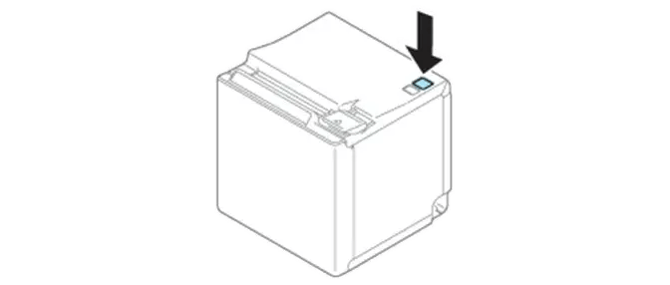
- Now insert the receipt roll. First open the printer's top cover by pressing the lever on the right side.

- Insert the receipt roll as shown in the illustration below.
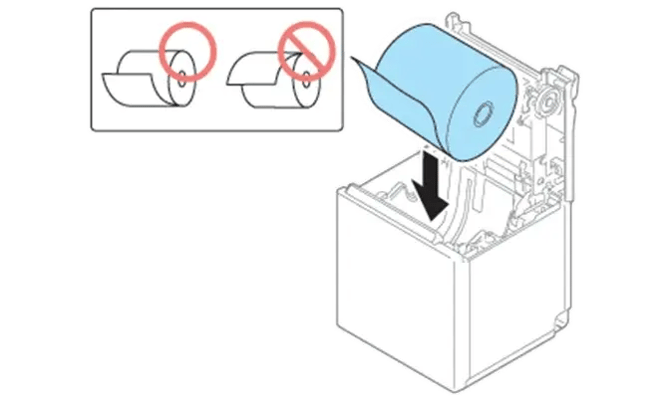
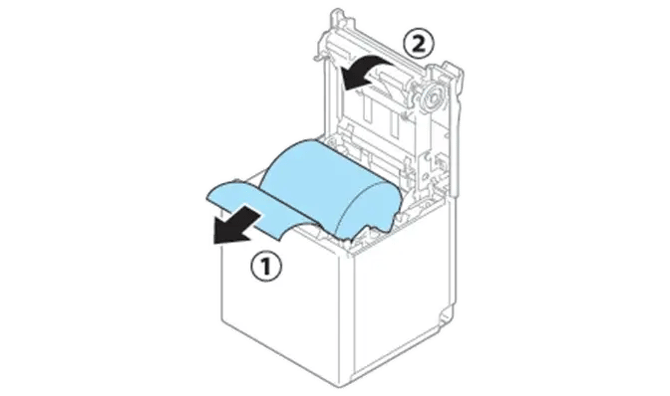
- Let the end of the roll stick out slightly from the printer, then close the cover by pressing down on both sides at the same time.
Connecting the Printer to Your iPad
Now follow these steps to connect your iPad:
- Open your iPad's Settings.
- Go to Bluetooth and make sure Bluetooth is enabled.
- Hold down the printer's power button for about three seconds to turn the device on.
- Once the Epson TM-m30 receipt printer appears in the list, tap it to connect and prepare it.
Opening the Printer in the Shore POS App
- Open the Shore POS App on your iPad.
- Tap the arrow > in the top left to open the app's menu, and select Settings at the bottom.
- Select the Hardware menu option > select Printer.
- Tap the Epson entry to set the printer as the active device.
- The printer is now configured and will automatically connect to the iPad from now on whenever both devices are switched on and within range.
Troubleshooting
Re-Pairing the Printer via Bluetooth
1) Remove the Old Printer From the iPad
Before reconnecting the printer:
- On the iPad, open Settings → Bluetooth.
- Look for "TM-m30II" or the name of your Epson printer.
- Tap the i icon next to the printer.
- Select "Forget This Device."
- Turn Bluetooth off on the iPad.
- Wait about 4–5 seconds.
- Turn Bluetooth back on.
Important: At this point, the printer should no longer appear as a connected device on the iPad.
2) Prepare the Printer for Bluetooth Pairing
- Make sure paper is loaded and inserted the right way.
- Turn on the printer.
- Open the paper cover.
- Hold down the FEED button for about 2 seconds.
- Then close the paper cover again.
The printer will now print a status sheet. At the same time, Bluetooth pairing mode is activated. On the TM-m30II, pairing is possible for about one minute, depending on the Bluetooth security settings.
3) Reconnect the Printer to the iPad
- On the iPad, open Settings → Bluetooth.
- Wait for "TM-m30II" to appear.
- Tap the printer.
- Wait until the printer shows as connected.
If the printer doesn't appear, repeat step 2 and start the search again right afterward.
4) Select the Printer in the POS App
Once the printer is connected to the iPad:
- Open the Shore POS App.
- Go to Settings → Hardware / Printer.
- Select the Epson TM-m30II.
- Check the connection with a test print.
- Save the settings.
Important: Don't select AirPrint. The POS app needs to use the Epson TM-m30II directly as the receipt printer.
Factory Reset – Epson TM-m30II
Only perform this if regular Bluetooth re-pairing doesn't work.
Important: A factory reset will reset the printer's saved settings. Besides Bluetooth, this can also affect other communication and printer settings.
Performing a Factory Reset
- Turn off the printer.
- Find the SW reset button: it's located on the bottom of the printer next to the Ethernet port.
- Press and hold the SW reset button using a pen, paperclip, or similarly thin object.
- Hold the button down for about 5 seconds.
- Turn on the printer while continuing to hold the button.
- Keep holding the SW reset button.
- After a short time, a printout reading "Resetting to Factory Default" will be produced.
- Once this printout appears, release the SW reset button.
The factory reset is now complete.
Afterward: Reconnect via Bluetooth
After the factory reset:
- Turn the printer off and back on.
- On the iPad, check under Settings → Bluetooth whether an old TM-m30II is still saved.
- If so: "Forget This Device."
- Turn Bluetooth on the iPad off and back on briefly.
- Open the paper cover on the printer.
- Hold down the FEED button for about 2 seconds.
- Close the paper cover again.
- The printer prints a status sheet and activates Bluetooth pairing mode.
- On the iPad, go to Bluetooth → select TM-m30II.
- Wait for the connection to be established.
- Then, in the POS app, go to Settings → Hardware / Printer and select the Epson TM-m30II.
- Perform a test print.
Common Errors
- Old printer still saved on the iPad: Under Bluetooth, first select "Forget This Device."
- Bluetooth turned off on the iPad: Turn Bluetooth on.
- Printer not in pairing mode: Open the paper cover, hold FEED for about 2 seconds, close the cover.
- Pairing mode expired: Depending on the security settings, pairing mode is only active for about one minute. Repeat the process.
- Printer is connected to the iPad, but the POS app isn't printing: In the POS app, check that Epson TM-m30II is actually selected, rather than AirPrint or another printer.
In Case of a Paper Jam
If paper gets jammed, it's important never to forcefully pull the paper out, as this can damage the printer. Instead, carefully open the roll paper cover and locate the jammed paper. Gently remove the paper by pulling it in the direction of the paper feed. Make sure all paper remnants are removed before closing the cover again.